Video player timeline manual |
Content
1. Controls
1a. Video Player
The control bar of the player provides the standard player controls, like play/pause and volume, but also controls to adjust the playback speed and jump to a specific point of the video.

- Current time value:
Displays the current point in the video. This part is also editable to jump to a specified point in the video. Shortcut: Ctrl-G. - Playback rate:
0.5x, 1x, 2x, 4x or 8x normal speed. Shortcut: Ctrl-L.
1b. Timeline
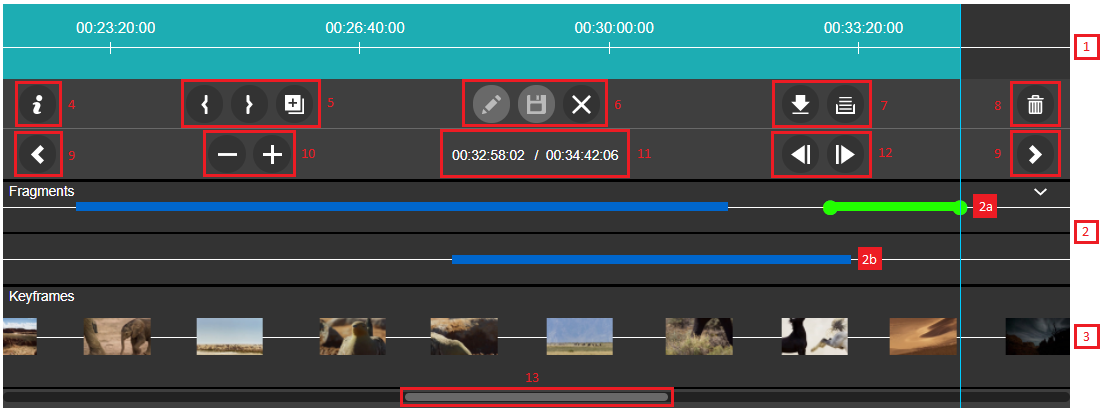
The timeline provides an interface to display, create and edit the fragments and partials of a video.
For easy navigation through the video it also displays the keyframes to easily jump to required points in the video.

- Time axis
- Fragment component:
Displays partials [2a] and fragments [2b] of the video. - Keyframe component:
Displays keyframes of the video. Hovering over these keyframes will show them enlarged with their corresponding timecode. By clicking on the element the video jumps directly that point. - Show keyboard shortcuts:
Show list of all keyboard shortcuts. Shortcut: Ctrl-I. - Partial edit buttons:
- Set start point of partial:
Set current point in video as start point of partial. Shortcut: F7. - Set end point of partial:
Set current point in video as end point of partial. Shortcut: F8. - Create fragment from partial:
Create a new fragment from a partial. Shortcut: F9.
- Set start point of partial:
- Fragment edit buttons:
- Edit:
Open metadata edit window. Shortcut: F1. - Save:
Save changes of start or end time of fragment. Shortcut: F2. - Cancel:
Cancel changes and deselect the active element. Shortcut: Ctrl-Z.
- Edit:
7. Download and downloadqueue:
a. Add to downloadqueue:
Add active fragment to the downloadqueue. Shortcut: F3.
b. Show downloadqueue:
Open window with queued downloads. Shortcut: Ctrl-Q.
8. Remove fragment or partial:
Delete the active fragment or partial. Shortcut: DEL.
9. Timeline navigation:
Navigate left and right over the timeline.
10. Timeline zoom:
Zoom in or out on the timeline. This can also be done using the mousewheel.
11. Start and end time of current fragment/partial:
Shows start and end time of the active fragment or partial.
These fields are editable to immediately set the time to the required point.
If no fragment or partial is selected, the fields can be used to jump to points in the video.
12. Frame by frame navigation:
a. Previous frame:
Go back 1 frame. Shortcut: Ctrl-Left.
b. Next frame:
Go forward 1 frame. Shortcut: Ctrl-Right.
13. Position slider:
Shows current position on timeline and allows easy navigation.
2. Tutorials
2.1 Partials

- Create a partial:
Set a start and end point with the buttons on the control bar [a]. - Changing start and end point:
This can be done in 3 ways.- Clicking the buttons on the control bar a second time [a]
- Specifying the times in the textfields [b]
- Dragging the start and end points over the timeline [c]
- Create new fragment from partial:
Clicking [d] will send the partial to the database and save it as a new fragment. - Deleting a partial:
Partials can be deleted by clicking [e] on the timeline.
2.2 Fragments

- Editing a fragment:
Clicking the fragment changes the color to light blue to indicate that it is selected and editable.
If the color changes to grey you don't have sufficient right to edit the fragment. - Edit fragment metadata:
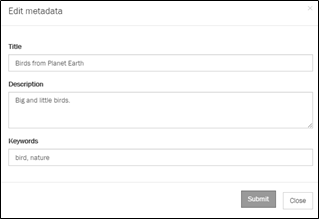
Clicking the edit button [a] will show an editing form. This form allows you to edit the title, description and keywords of the fragment. Keywords should be separated by comma’s.
- Changing start and end point:
The start and end point of fragments can be edited in 2 ways, similar to editing those of the partials.
These changes can be saved by clicking the save icon [b].- Specifying the times in the textfields [e].
- Dragging the start and end points over the timeline [f].
- Cancel changes:
Clicking the cancel button [c] will restore the start and end points of the selected fragment to their original values if those changes aren’t saved yet. - Deleting fragments:
Fragments can be permanently deleted from the database with the trashcan icon [d].
2.3 Downloadqueue

- Add fragments and partials to queue:
Fragments and partials can be added to the downloadqueue by selecting the fragment or partial and clicking the download button .
.
- Managing the downloadqueue:
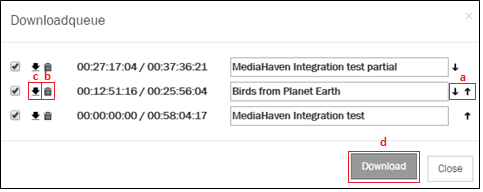
Clicking on the timeline will open the downloadqueue. Here you can change the download order of the fragments [a] or delete them from the queue [b].
The filename of the downloaded file can be set with the textbox.
- Download single fragment/partial:
Files can be downloading separately by clicking their respective download icons [c]. - Download multiple fragments/partials:
You can download all or several files at once by checking the checkboxes and clicking the download button [d].
